


The Crowning Glory - Get Your Turkey Perfect This Christmas
Posted by Rob Whitchurch on 19th Dec 2025
Your No-Fuss Christmas Turkey Guide (Because You’ve Got Enough to Worry About)
Every year at Charlies, we hear the same thing: “It’s the turkey I’m worried about!” And honestly? We get it. So this year, we’re here to guide you through it — from first prep to the final slice.
The centrepiece of any Christmas Day meal is the Turkey. Whether you opt for a whole bird or keep it simple with a crown, it can be a daunting task if you've never attempted it before, and with Christmas day already being a hectic whirlwind of people visiting, presents being unwrapped and making sure everyone stays merry and bright, the stress of the day is very much real.
Timings have to be perfect too, as you don't want the trimmings cooked and the turkey looking like a decent vet could revive it. But fear not, this isn't our first time, and here at Charlies, we know that preparation is key. So we're here to guide you with our tips & tricks to ensure your turkey is crispy, moist, and the talk of the table.
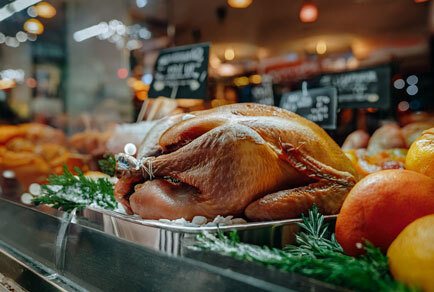
Pick the Perfect Bird
First things first, choosing the right turkey for you. In this instance, size does matter, as you don't want to get a small bird and realise there's not enough to go around, but on the other hand, you don't have to buy the biggest one in the shop (yes, the one as big as me) as you'll end up eating leftover turkey till Easter.
You’ll also want to decide between a fresh or frozen turkey. Fresh birds can save you thawing time and often have slightly better texture, while frozen ones are easier to find and can be bought well in advance; just remember to defrost it before the big day.
As a general rule of thumb, 175g (cooked) per person will keep bellies full, that’s roughly 250–300g of raw turkey per person, since you’ll lose some weight during cooking.
On the other hand, if you're like me and end up going for seconds (and sometimes thirds....maybe fourths if I'm feeling peckish) then a slightly larger bird will keep all your guests full and napping before the King's Speech, with plenty left over for a turkey curry, sandwich or pie...if there's any left, of course.
A quick word on crowns vs whole birds: a turkey crown is basically the breast meat on the bone, so it cooks faster, fits smaller ovens, and suits guests who prefer white meat. A whole turkey, on the other hand, gives you that classic table centrepiece moment and the bonus of dark, flavourful leg meat.
A good guideline for picking your bird is as follows:
| Type | Weight | Number of People |
|---|---|---|
| Turkey Crown | 2-2.5kg | 6 |
| Small Turkey | 3-4.5kg | 6-8 |
| Medium Turkey | 4-5kg | 8-10 |
| Medium/Large | 5-5.5kg | 10-12 |
| Large | 6-6.5kg | 10-12 |
Just make sure it can fit in your oven and roasting tin, there's nothing worse than picking the perfect bird or crown and realising it doesn't fit.
If you’re unsure, measure your oven or try placing your roasting tin inside before buying — trust me, wrestling a too-big turkey into a too-small oven is a Christmas Day workout no one needs.
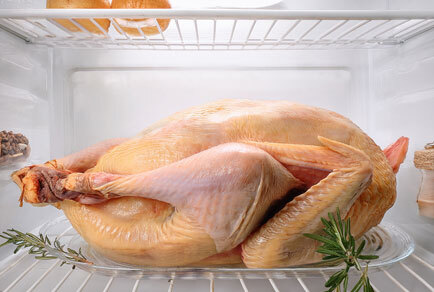
The Big Thaw: How to Defrost Your Turkey Safely
If you're organised this year, and you've planned ahead and bought your turkey before the mad scramble, well done, that's half the battle won! But before the big day arrives, you'll need to make sure your turkey is properly defrosted; otherwise, you'll be left with a solid lump of meat that only Arctic explorers can break into, plus it'll mean the thickest parts of the bird might not cook enough, and nobody wants food poisoning on Christmas Day.
The safest and recommended way to defrost your turkey is to pop it in the fridge. A general rule of thumb is 12 hours per kg; that does mean larger birds or joints might take up to three days to fully defrost, so make sure you plan ahead, as you don't want to be left birdless on Christmas Day.
If fridge space is at a premium, there are a few other methods you can try to get your bird ready.
The classic, and most well-known method, is leaving it out on the side in a metal roasting tray and letting it defrost at room temperature. While quick and easy, this way of defrosting isn't advised, as if the temperature fluctuates, bacteria can start to breed, but if you're careful and are going to cook your turkey as soon as it's defrosted, then we can't dismiss this option. Just ensure you keep it away from any ovens or radiators. Defrosting this way can take up to 24 hrs for your turkey to be oven-ready.
If you're in a pinch and got caught up in the merriment of the season and completely forgot to take the turkey out to defrost, an alternative method is popping the bird in a bucket or sink full of cold water and letting it defrost. This method does involve checking the water temperature occasionally to ensure your water is still cold to the touch.
If it isn't, replace it with fresh cold water. This method takes about 1 hour per kg, and while being the quickest method, you do have to ensure the turkey is in its original packaging with no cuts or tears to ensure no cross-contamination.
The quickest method is the microwave. While only suitable for small turkeys and joints, it's ideal when time is against you. If you are doing it this way, remove the packaging, take off the metal clips, and remove the giblet bag. Have a look at your microwave manual for precise times, or set your defrost function for 30 minutes and then 5-minute bursts until it's defrosted. Don't forget to clean your microwave thoroughly after use.
How to Tell if Your Turkey Is Fully Defrosted
Whichever method you use, before you pop it in the oven, it is best to check you're fully defrosted and ready to go:
| Test | Method |
|---|---|
| Touch | Remove the bag of giblets and put your hand in the cavity. Touch the inside of the breastbone around the cavity. This shouldn’t feel frozen at all. Press the breast meat – it should feel soft. If it’s solid, it’s still frozen. |
| Wiggle | Move the legs and wings – they should be fairly loose. If they are stiff or can’t be moved, the turkey will need to be defrosted further. |
| Temperature | You can insert a probe thermometer into the thickest part of the leg or breast. If it reads anything below 1°C, the turkey is still frozen. |
The Calm Before the Roast - Prep Like a Pro
So, your crown or bird is defrosted and ready to go, but before we set the timer and pour ourselves a quick glass of Buck's Fizz, there is a little bit of prep work to do.
First things first, PREHEAT YOUR OVEN! The last thing you want is the breast meat cooked and the legs undercooked. Not only will this throw off the rest of your timings, but having to wait for the rest of the bird to cook can mean the breast may dry out, which nobody wants.
If you have time a few days before, try brining your turkey. Dry brining involves rubbing your turkey generously with salt, inside and out, and leaving it uncovered in the fridge for 24 hours. This method allows the salt to draw out moisture from the meat, resulting in a more concentrated brine that will soak back into the meat as it cooks, resulting in juicy and moist meat and crispier skin too!
The alternative is a wet brine, which involves fully submerging your turkey in a saltwater bath for 24 hours before patting it dry. This method helps guard against your bird drying out, as well as helping introduce your extra flavours (herbs, lemon, onion, etc) into your turkey when it comes to cooking. Wet brining helps lock in moisture and gently seasons the meat all the way through.
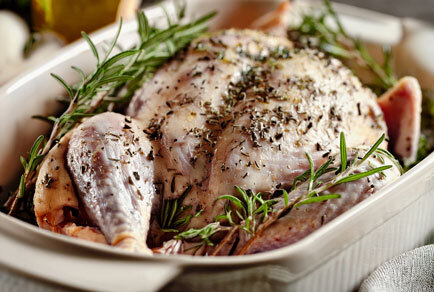
But before it goes in the oven, there is a little bit of work we can do to ensure crisp skin and flavoursome meat. Take your bird out of the fridge an hour before and let it get up to room temperature. This ensures a more even cook and prevents the breast from drying out while waiting for the legs to catch up.
Remove the giblet bag (usually found in the cavity) and set it aside as it's full of bits we can use to make turkey stock, which is a great base for your gravy. Pat your turkey dry inside and out, unless you've brined it, then you can skip this bit.
It may sound odd, but it's the perfect way to get that classic golden brown look as well as that crispy skin everyone fights over at the table. For that classic presentation, truss your turkey before you pop it in the oven by tying the legs together and tucking the wing tips underneath so they don't burn.
If you fancy something a little left field, you can try spatchcocking your turkey. This method involves removing the backbone (with a pair of poultry shears, or sturdy kitchen scissors) and pressing down on the breastbone so that the breast and legs are the same height. This method results in a quicker cook time as well as a much crispier skin than the traditional method, plus the fat will render a lot better from the opened-up bird, allowing it to effectively baste itself, but you can still give it a helping hand if you want.
For the ultimate flavour and moisture, rub the skin and breast meat with butter. Gently loosen the skin with your fingers first so you can get underneath without tearing it — that’s where the magic happens. Mix your butter with herbs like sage, rosemary, thyme, or parsley, and season the bird generously with salt and pepper. If you’re going all out, fill the cavity with lemon halves, a quartered onion, herbs, or even stuffing. Just remember to weigh your stuffing before it goes in, as it’ll affect your total cooking time... speaking of which.
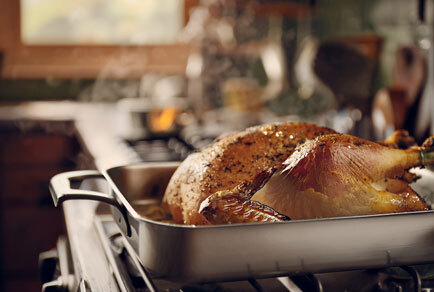
Cooking the Turkey - Getting It Just Right
It goes without saying, check the cooking time on the packaging BEFORE you throw it away, as this will give you a good idea of how long your turkey will take to cook, as well as oven temperature.
As a general rule, 20 minutes per kg plus either an extra 70 or 90 minutes, depending on the size (70 if under 4kg, 90 if over), usually at 180°C/350°F/Gas Mark 4, but do double check on the packaging or cooking advice. If you’ve stuffed your turkey, make sure you base your cooking time on the total weight including, stuffing, as it takes longer for the heat to reach the centre.
Pop your bird or crown in your preheated oven, breast side up, although there is an argument that popping it upside down helps your turkey retain its moisture; however, you don't get that classic golden brown breast if you cook it this way, unless you turn it over for the final 30.
Cover loosely with tin foil, as this will help stop the breast drying out, and as an optional step, baste your turkey every 45 minutes to help keep your bird moist, but don't do it too often, as you'll lose precious heat from your oven, which can lead to longer cook times.
Avoid basting in the final half hour, as well as removing the tin foil tent, as this will allow the skin to crisp up...which is always the best part.
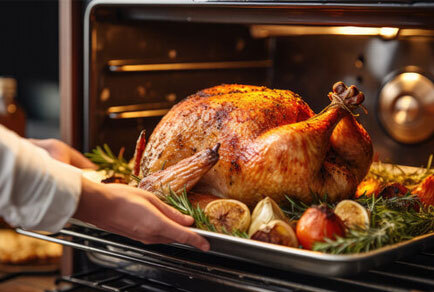
When time's up, before you pull your bird out of the oven, it's always best to check that it's perfectly cooked. The best way to check this is with a meat thermometer, don't just rely on the pop-out red button it comes with. You want to probe the thickest part of the breast as well as the thickest part of the thigh, just don't let the probe touch the bone.
You're looking for 70°C (160°F) at the thickest part of the breast and 75°C (167°F) in the thigh to ensure it's cooked through. To double check, cut into the thickest part, and check that the juices run clear and there's no pink meat visible. If it passes both these checks, pull it out of the oven and onto the side, but don't carve it straight away, as you'll end up with the juices running all over the place. It's time to rest your bird.
Give Your Bird a Breather - Resting Your Turkey
Once your turkey's out of the oven, cover it loosely with kitchen foil and leave it to rest for 30-45 minutes. If you're cooking a monster turkey, you can leave it to rest for up to an hour. It'll still stay piping hot and allow those juices to redistribute evenly through the heat to keep every slice tender and juicy, and it'll be easier to carve.
Don't cover your turkey too tightly either, as this may cause the skin to stick to the foil, and you'll lose that perfect crispy skin you've worked so hard to get.
You can use this resting time to get your trimmings ready, turn your juices and giblets into gravy, and maybe top up that Buck's Fizz because you've earned it!
Carving & Serving - Time to Show Off Those Knife Skills
The big moment has arrived — the turkey’s rested, the trimmings are ready, and the kitchen smells incredible. It can only mean one thing: it’s time to carve!
Pop your bird or crown onto a sturdy cutting board and make sure your carving knife is nice and sharp. If you’ve got one, a carving fork helps steady the bird while you slice, and an electric carving knife can make light work of larger birds, so it feels less like a workout.
You’ll know it’s ready to carve when the surface feels warm to the touch but not too hot to handle, and the juices have stopped pooling on the tray.
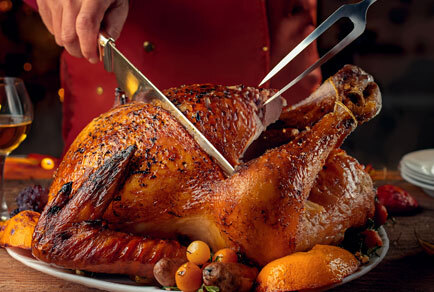
If you've opted for a crown, slice parallel to the breastbone for nice, even slices. You can even slice the entire breast off the bone to make it easier to carve. Just flip it over and take out the wishbone first, so it's easier to remove the entire breast from the bone.
To carve your bird, find the natural joints holding the legs & thighs to the body, and simply slice through the skin. While you're cutting, ease the leg away from the body till you find a joint and cut through. Repeat this for the other side.
You can serve the leg and thigh together, but if you want to separate them, find the natural joint holding them together and cut through. You can then decide if you want to serve them whole or cut them up. Remove the wings in the same way, finding the natural creases and the natural socket where it's attached to the breast.
You can then either slice the breast meat directly on the bone for nice slices, or remove the breast whole by slicing down the breastbone and underneath near the ribs, and transferring it to another chopping board so it's easier to carve. Always carve against the grain (across the fibres of the meat) as this will keep every slice tender.
Once it's all plated up, it's time to eat! Just make sure you save the best bits for yourself though, since you've done all the hard work!. And since you've cooked it, officially by law, you don't need to do the washing up.
The Final Feast - You Did It! Time to Eat
And there you have it. Our simple guide to cooking the perfect turkey this Christmas. From choosing your bird to carving the final slice, you've conquered every step like the culinary pro you are.
If you've got leftovers (and let's face it, you will), don't let them go to waste. Turn them into a Boxing Day leftover pie, a warming turkey curry, or a classic turkey soup. You can always send your guests home with a little care package.
So pour yourself another Buck’s Fizz, sit back, and enjoy that glorious Christmas dinner you’ve worked so hard for. You’ve officially earned your place at the head of the table.
For more festive inspiration and seasonal tips, check out more of our Christmas-inspired blogs, and don't forget to follow us on Instagram and Facebook. Have you got a method we haven't mentioned? Do you deep fry or barbecue your turkey? Tag us in your Turkey pics and share your Christmas feast with us. From all of us at Charlies, we hope you have a very Merry Christmas and a Happy New Year.